
Nicknames and Avatars
Options for avatar usage, linkage between chat profile and main platform profile, and nicknames
Four options for user avatars in Watchers' chats
- Avatars pre-set: you can go with Watchers' default preset of user avatars, or upload your own branded preset;
- Users' images as avatars: activate an opportunity for users to upload their own image as an avatar;
- Both options together: activate both of them and give users a choice: they will be able to select an avatar from your preset, or upload their own picture;
- Users' avatars from the main platform : transfer themvia GET parameter.
Select a desired way on the Settings > Chat customisation > Avatars.
Moderators and admins can upload special avatars through the admin panel even if an opportunity to upload a picture for users is turned off.

In-Chat Profile Setup
If you allow users to select an avatar and create a specific chat nickname, the flow appears as shown in the picture below. You can choose in Settings whether your users will be able to change their nicknames and avatars, or if they need to stick with one they chose when entering for the first time.
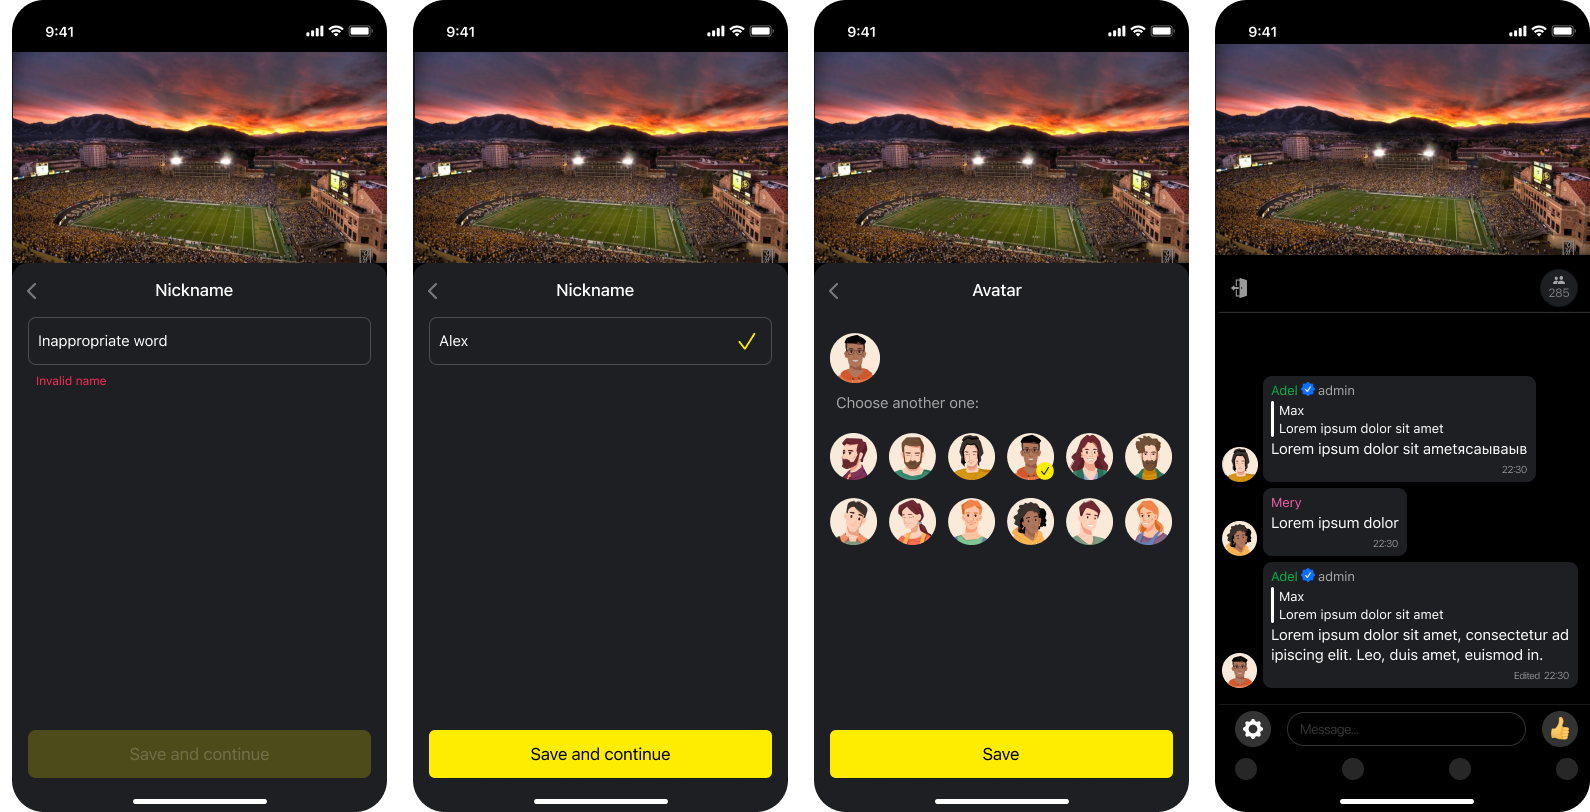
Avatars
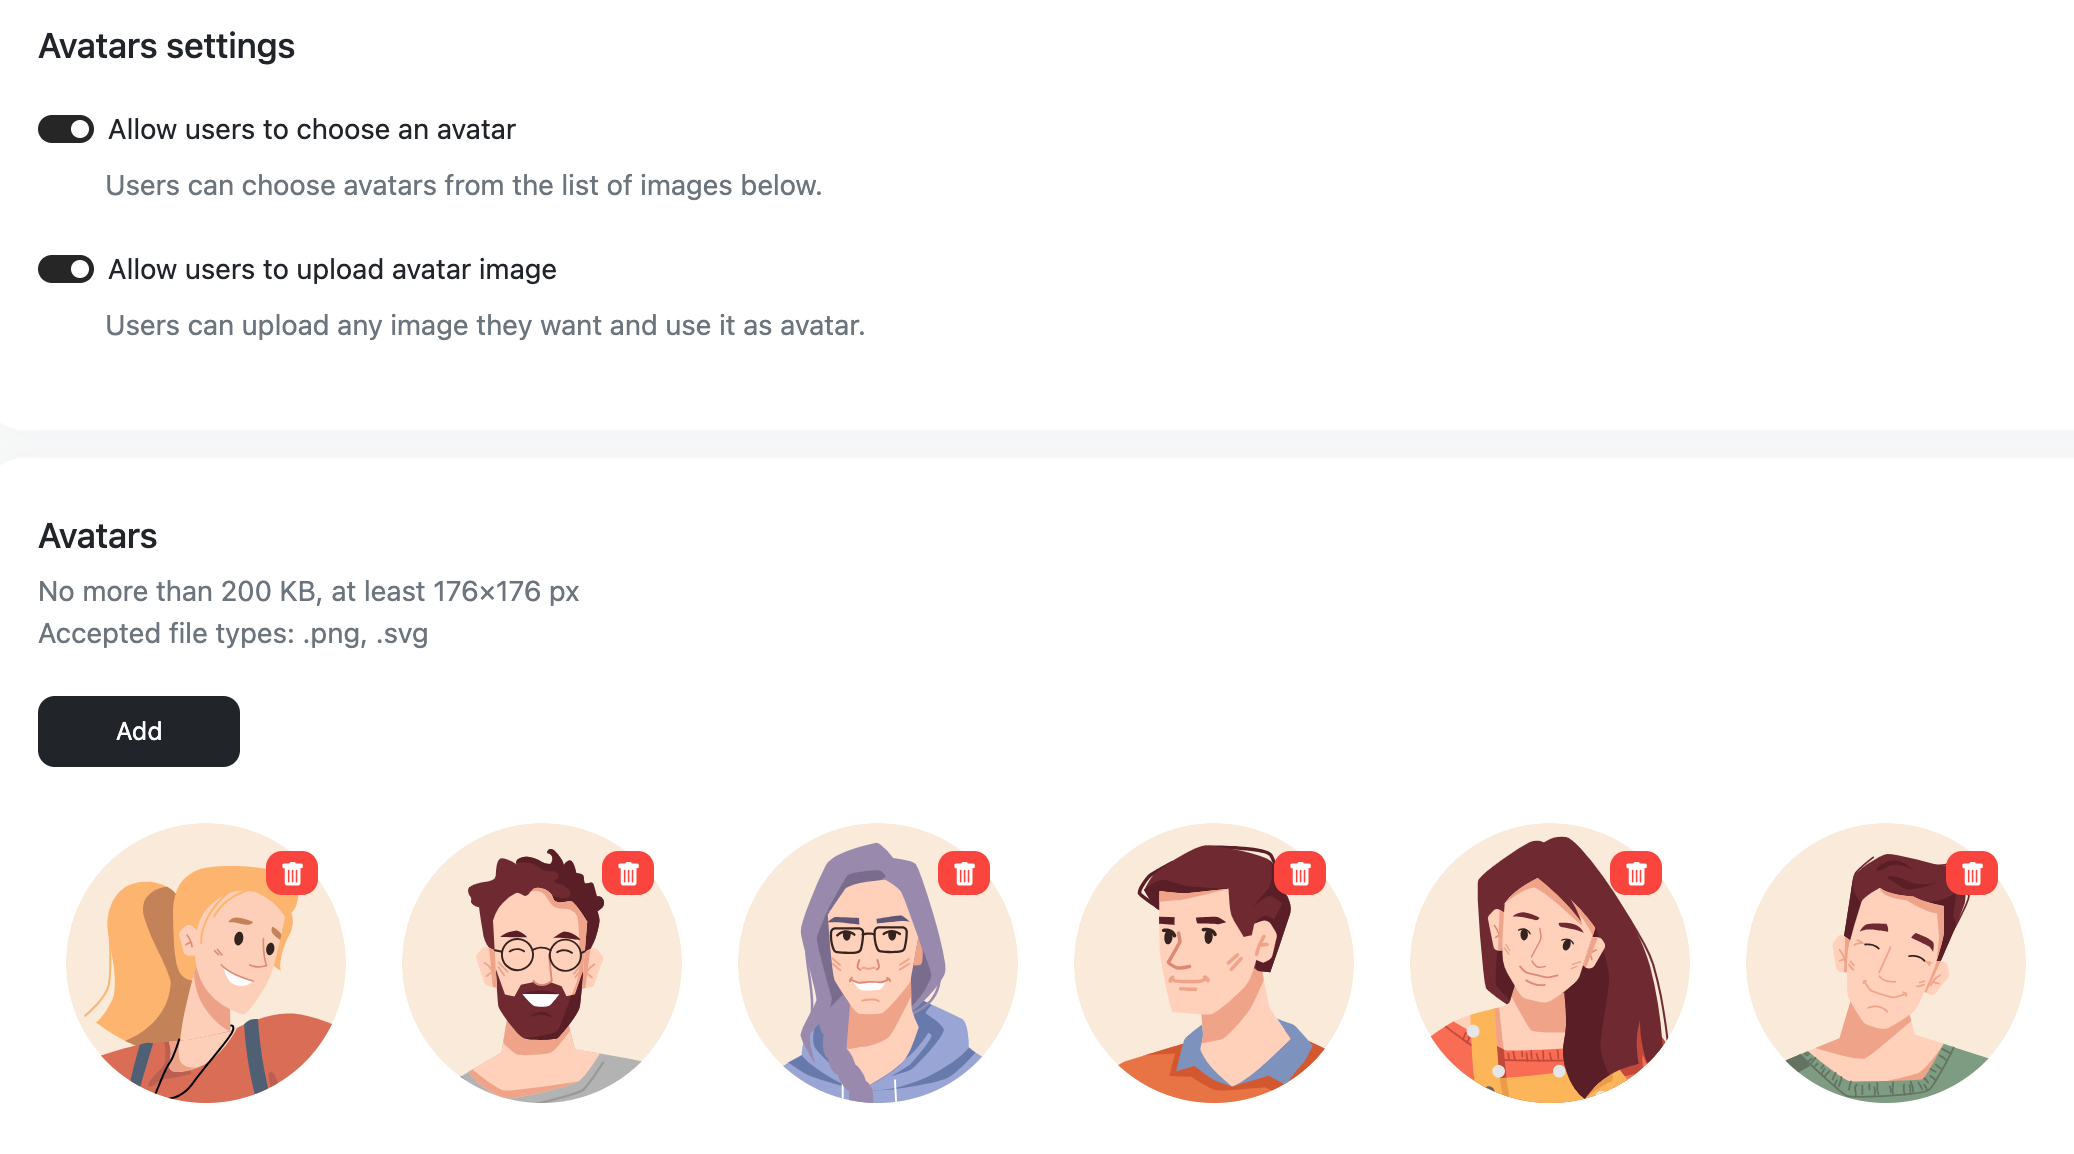
We offer several default pre-sets of avatars, which are available on the admin panel. Please choose one of them and activate it with a toggle.


Clients can also upload their avatar pack to the admin panel directly. It can be done in the same section: Customisation > Avatars: https://chatadmin.watchers.io/chat-customization?tab=avatars
If the client activates the option for users to upload pictures for avatars, users will be able to do so via a chat interface. When this feature is active, the AI moderation system pre-moderates pictures before showing them in a chat. Also, admins and moderators can additionally check the avatars and block them if needed.
Requirements for user avatars:
- format: png, jpg, jpeg, heic, gif
- weight: not more than 25 Mb

Nicknames
A nickname must be no longer than 25 characters and can consist of any character. When users create nicknames, the system checks them in the pre-moderation lists. Additionally, a specific block list for nicknames exists, allowing clients to restrict certain words from being used in nicknames, while the exact words can still be typed as messages.
Please keep in mind that it is not possible to address a specific user by name in the chat, as user names are not unique.
Learn more about moderation in chats: https://docs.watchers.io/docs/advanced-moderation#/
Using Platform Profiles in Chats
Users can join chats with avatars and nicknames from the main platform's profile. In this case, we take avatars and nicknames that users set on the main profile. So, they join chats, avoiding the authorisation step. If they want to change their nickname or avatar, they should do it through the main profile on the platform.
Passing Avatars via GET Parameters
Partners can choose from two methods to integrate user avatar information via GET parameters:
- Image ID Method: Utilise the
imageIdGET parameter to supply a unique identifier corresponding to each user's avatar image within your application. This identifier enables our system to fetch the user's avatar image directly from your backend. To facilitate this, partners are required to provide a URL to their backend that hosts the avatar image database. For instance, the URL could follow this format:https://api-gw.example.com/social/file/v1/cache/profile/avatar/[picId]?size=small, where [picId] should be replaced with the unique imageId of the user's avatar. - Direct Image URL Method: Use an
imageGET parameter to supply a direct URL to the image that will represent the user's avatar on our platform. The format should follow:https://url_to_img.

Select the integration method that aligns with your operational preferences and adjust the corresponding setting in the Admin Panel under Settings > Functional Settings.
Passing Names via GET Parameters
To integrate user names, use the following GET parameter:
Nickname: Employ a nickname GET parameter to pass the user's nickname as it is recognised within your system. This nickname should not exceed 50 characters and may include Latin, Cyrillic, or special characters, with no restrictions on character types.
Also, you need to activate the needed toggle in the functional settings on the admin panel to receive them: https://docs.watchers.io/update/docs/nickname
Admin Panel Adjustments for User Identity Consistency
After selecting your avatar integration method and configuring the settings for user nicknames, please adjust the following settings in the Admin Panel to ensure consistency in the presentation of user identities:
Navigate to Admin Panel > Settings > Appearance. Disable the following options:
- Name/Avatar Change: Once disabled, this setting prevents users from changing their names and avatars within the chat settings, thus safeguarding the integrity of the integrated user properties.
- Onboarding: This option turns off the ability for users to set their name and avatar during their initial session, thereby preserving the pre-established user identities from the partner system.
Resetting users' avatars and nicknames
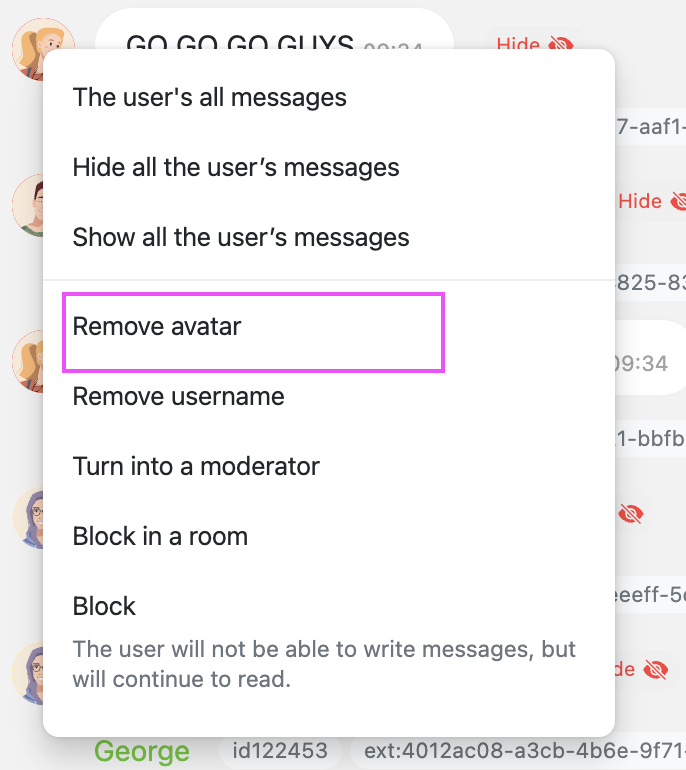
If you allow users to choose nicknames specifically for a chat and upload avatars, you can also delete them if they violate chat rules.
To reset nicknames, select this action from the contextual menu of the avatar.
There are two ways to reset an avatar:
Through the contextual menu of the avatar
Through the User avatars section in Moderation outcomes
Please note that both of these actions are irreversible.
Special Avatars for Guests and Admins
Clients can upload specific avatars for their users. To do that, they need to enter a particular room through the admin panel, open the list of participants, click on the avatar of the needed user, and upload a picture.

Open the list of users and click the avatar to upload a picture
Clients can upload branded avatars for moderators and admins who communicate in rooms.
Resetting users' avatars and nicknames
If you allow users to choose nicknames specifically for a chat and upload avatars, you can also delete them if they violate chat rules.
There are two ways to reset an avatar:
- Through the contextual menu of the avatar
- Through the User avatars section in Moderation outcomes
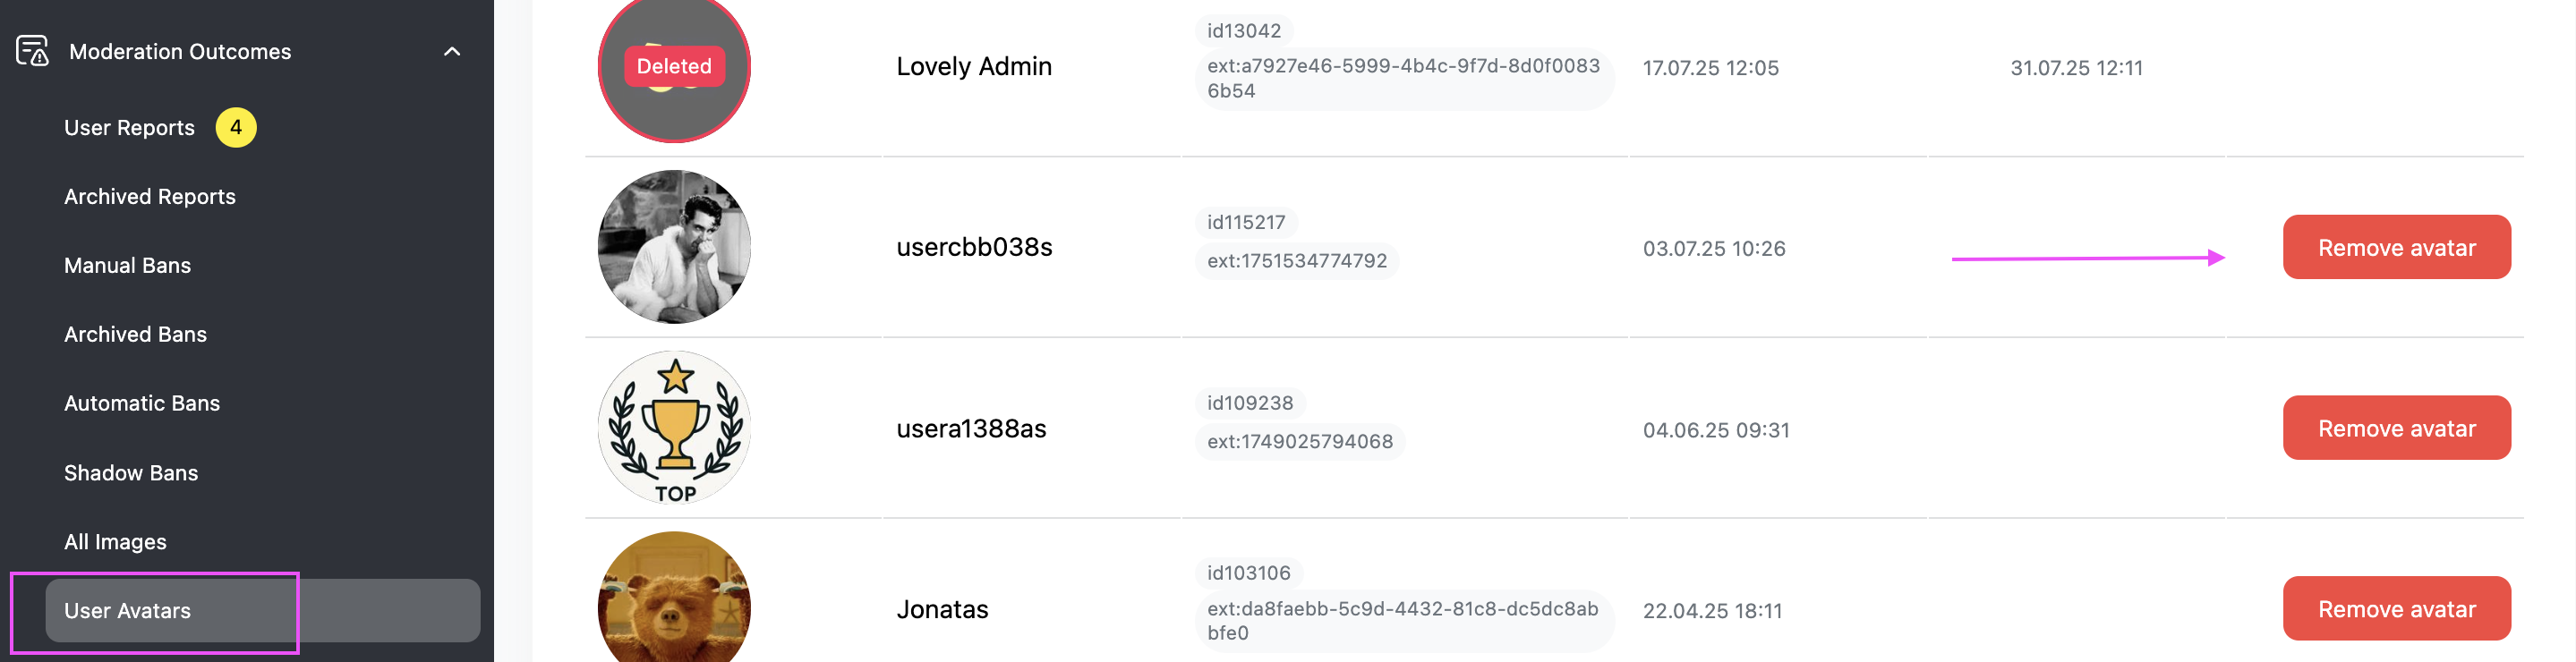
Please note that both of these actions are irreversible.
Updated 2 months ago